Rostering and SSO
As a system administrator or district manager, learn how to set up mySciLEARN to work with supported rostering and single sign-on providers.
On this page:
About rostering and single sign-on
Many school districts employ rostering and single sign-on solutions to manage interoperability with their student information systems and online learning applications. mySciLEARN supports the following rostering and SSO providers for managing student enrollment and product access:
Which ClassLink roster data is supported?
mySciLEARN supports importing student data in OneRoster 1.1 format using the ClassLink OneRoster REST API.
To learn more see How ClassLink rostering works with mySciLEARN.
Which authorization protocol does mySciLEARN use?
mySciLEARN supports the OAuth 2.0 protocol for both rostering and SSO authentication.
Can I use ClassLink SSO without rostering?
Yes. ClassLink SSO and rostering can be used independently if needed.
Can both staff and students use SSO on mySciLEARN?
mySciLEARN supports SSO for students only; staff users are not supported at this time.
Which devices are supported for SSO? What about iPad?
Students can use SSO with any mySciLEARN supported device, as long as that device is also supported by their provider.
Both ClassLink and RapidIdentity provide SSO through a web browser, which works seamlessly with our components on iPad.
ClassLink Rostering & SSO
ClassLink Rostering
- In Roster Server, add the mySciLEARN app. You can find it on your ClassLink Dashboard, under Apps.
- Enable permissions for the mySciLEARN app, and allow access to Demographics.
You can customize these permissions, if needed. Consult your ClassLink documentation for details.
- Log in to mySciLEARN as a district manager. Only district managers can perform this task.
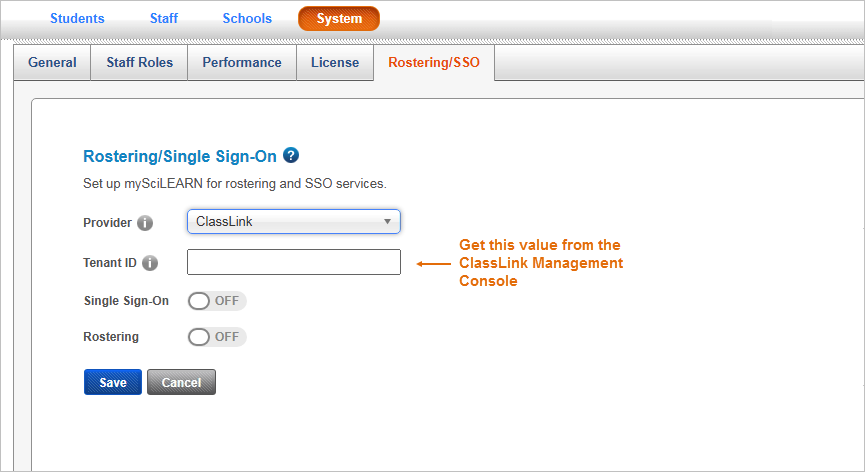
- On the Manage > System page, click Rostering/SSO.
- Choose ClassLink from the menu.
- Enter the ClassLink Tenant ID. You can find this ID in the ClassLink Management Console, at the top left of any screen.
- Turn on rostering (and single sign-on if you plan to use it) and click Save.
After you’ve added your ClassLink Tenant ID and turned on rostering, contact Scientific Learning Customer Support to complete the next step.
You’ll need to provide the ClassLink “sourcedId” for each school you want to roster with mySciLEARN. You can find the sourcedId on your ClassLink Dashboard, under Orgs.
- After Step 3 is completed and your schools are mapped, the first sync will be scheduled. mySciLEARN automatically syncs with ClassLink Roster Server every night at 11pm Pacific Time.
- On the first sync, mySciLEARN imports all of the student roster data the mySciLEARN roster app has access to and creates the students for each school.
- mySciLEARN adds all of the new students to the Default Group at the school. The students will be associated with all staff members who have access to that group.
- For schools using per student licenses, students will be assigned components on a first come, first served basis.
- Each day after the first sync, mySciLEARN checks for changes in the roster data and updates mySciLEARN as needed, performing the following actions:
- Adds new students (see Student roster data)
- Edits existing students
- Deletes students from mySciLEARN by transferring them to the district
- Transfers students to another mySciLEARN school in the district
Student roster data
The following table shows which student data is needed to create a student in mySciLEARN. If any of the required data is missing or incorrect, the student will be rejected until the issue is resolved in ClassLink. For details on student data requirements see Add new students.
|
Student roster data |
Required? |
ClassLink roster file |
|---|---|---|
|
First name |
Yes |
user.csv |
|
Middle Initial |
No |
users.csv |
|
Last name |
Yes |
users.csv |
|
Date of birth |
Yes |
demographics.csv |
|
Username |
Yes |
users.csv |
|
Password |
Yes |
users.csv |
|
Grade |
Yes |
users.csv |
|
Gender |
Yes |
demographics.csv |
|
School |
Yes |
users.csv |
|
English Language Learner (ELL) |
Yes |
N/A, defaults to No in mySciLEARN |
|
Special Education Services (SES) |
Yes |
N/A, defaults to No in mySciLEARN |
|
Race/Ethnicity |
No |
demographics.csv |
|
Student ID |
No |
users.csv |
If you have any further questions or concerns, contact Scientific Learning Customer Support.
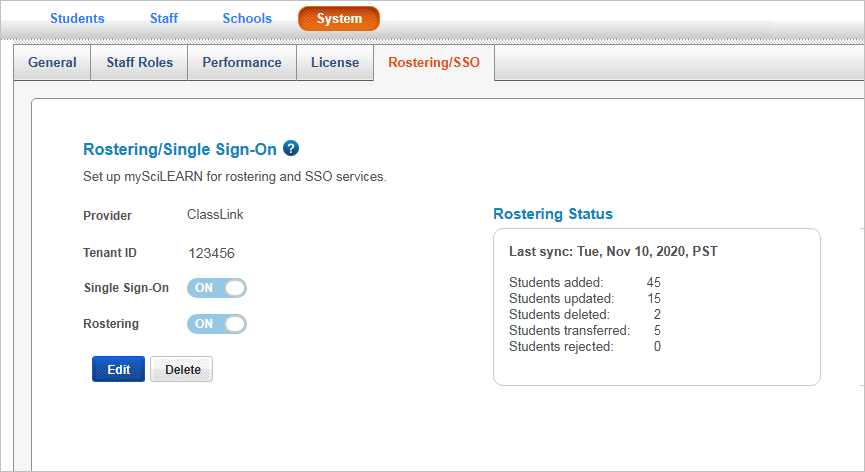
Q: The Rostering Status screen in mySciLEARN shows that some of my students were “rejected” during the last sync. What does this mean?
A: If the required student data does not exist in ClassLink or it does not meet mySciLEARN requirements, that student will be rejected until the issue is corrected in ClassLink. To learn more see Student roster data. To find out which students are being rejected at which schools, contact Scientific Learning Customer Support,
Q: I changed a student’s data in mySciLEARN, but I don’t see the change in ClassLink. What’s going on?
A: mySciLEARN does not support sending data to ClassLink, so you’ll need to make the change in ClassLink manually or it will be overwritten in mySciLEARN on the next scheduled sync.
Q: The Rostering Status shows a warning message with “server errors” after the last sync. What happened?
A: If the sync does not complete due to server errors, mySciLEARN will report the number of schools for which the sync did not complete, and why. If you see either of these messages, contact Scientific Learning Customer Support,
- ClassLink server connection errors — The sync was not completed for the school(s) because mySciLEARN could not access the ClassLink server.
- mySciLEARN connection errors — The sync was not completed for the school(s) due to a mySciLEARN server error.
ClassLink SSO
- Log in to mySciLEARN as a district manager. Only district managers can perform this task.
- On the Manage > System page, click Rostering/SSO.
- Choose ClassLink from the menu.
- Enter the ClassLink Tenant ID. You can find this ID in the ClassLink Management Console, at the top left of any screen.
- Turn on SSO and click Save.
If you’re using ClassLink rostering with mySciLEARN, you can skip this step.
When using single sign-on, mySciLEARN needs to identify each student that logs in through that provider. It does this by requiring matching usernames in the student’s mySciLEARN account and SSO provider account. For example:
SSO provider account username: jdoe123@school.com
mySciLEARN account username: jdoe123@school.com
If you haven’t added your students to mySciLEARN, make sure to enter the exact same username that the student uses to log in to your SSO provider, including letter case, spacing, special characters, and numbers (if any). If your students are already added to mySciLEARN, you can use our Update students from a file feature to change their usernames in our system to match the names in your SSO provider.
The last step is to give your students access to mySciLEARN when logged in to your provider. See your provider’s documentation for details.
Tip: Use the ClassLink Management Console to add the mySciLEARN app from the App Library, then assign the app to a profile, group, or user. When added and assigned, students will see the mySciLEARN icon on their dashboard:
![]()
- Open a web browser on any supported device and log in to your SSO provider.
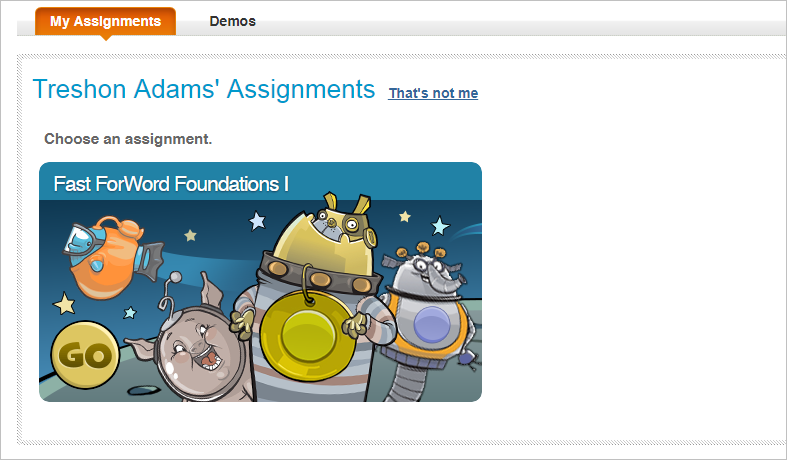
- Click the mySciLEARN application in your SSO provider dashboard.

The Student Exercises page opens in the browser. Choose an available assignment to start using it.
If you have any further questions or concerns, contact Scientific Learning Customer Support.
Q: My students are taken to the mySciLEARN login page instead of being automatically logged in. Why?
A: First, make sure your students can access the other software programs through ClassLink. If so, check to see if the student username is different in mySciLEARN and your SSO provider. The usernames must match exactly. Learn more.
RapidIdentity SSO
At this time, mySciLEARN only supports SSO with RapidIdentity.
To start, you’ll need to create a mySciLEARN OAuth 2.0 Federation Partner in RapidIdentity. See the RapidIdentity documentation for details. When creating the Federation Partner, use these settings:
- Type – OAuth 2.0
- Name – mySciLEARN
- Description – mySciLEARN
- Callback URL – This URL is unique to your mySciLEARN school district. Copy and paste the URL shown on the Single Sign-On settings page in mySciLEARN:

You’ll also need to add an LDAP attribute to the new mySciLEARN Federation Partner. This maps the RapidIdentity student username value to the value used by mySciLEARN. Use these settings:
- Type – LDAP
- Name – userName (match case exactly)
- Single Valued – False (leave this option unchecked)
- LDAP Attribute – userPrincipalName (match case exactly)*
* If using a different LDAP attribute, enter that attribute name instead of userPrincipalName
After setting up the Federation Partner, add the mySciLEARN application to the RapidIdentity Application Catalog. See the RapidIdentity documentation for details. When creating the application, use these settings:
- Name – mySciLEARN
- Description – Fast ForWord
- Icon – Use the following mySciLEARN icon (click to download):
- Application URL – This URL is unique to your mySciLEARN school district. Copy and paste the URL shown on the Single Sign-On settings page in mySciLEARN:


When activating the application in RapidIdentity, you can choose to make the mySciLEARN application available to all of your RapidIdentity users. See the RapidIdentity documentation for details.
- Log in to mySciLEARN as a district manager. Only district managers can perform this task.
- On the Manage > System page, click Single Sign-On.
- Choose RapidIdentity from the menu.
- Enter the following settings from RapidIdentity and click Save. See the RapidIdentity documentation for details:
- OAuth 2.0 Federation Partner Client ID
- OAuth 2.0 Federation Partner Client Secret Key
- Identity Provider Configuration Base URL

When using single sign-on, mySciLEARN needs to identify each student that logs in through that provider. It does this by requiring matching usernames in the student’s mySciLEARN account and SSO provider account. For example:
SSO provider account username: jdoe123@school.com
mySciLEARN account username: jdoe123@school.com
If you haven’t added your students to mySciLEARN, make sure to enter the exact same username that the student uses to log in to your SSO provider, including letter case, spacing, special characters, and numbers (if any). If your students are already added to mySciLEARN, you can use our Update students from a file feature to change their usernames in our system to match the names in your SSO provider.
The last step is to give your students access to mySciLEARN when logged in to your provider. See your provider’s documentation for details.
Tip: If you’ve added the mySciLEARN icon to your application setup and bookmarked it (see step 2), students will see the mySciLEARN icon on their dashboard:
![]()
- Open a web browser on any supported device and log in to your SSO provider.
- Click the mySciLEARN application in your SSO provider dashboard.
The Student Exercises page opens in the browser. Choose an available assignment to start using it.
If you have any further questions or concerns, contact Scientific Learning Customer Support.
Q: My students are taken to the mySciLEARN login page instead of being automatically logged in. Why?
A: First, make sure your students can access the other software programs through RapidIdentity. If so, there are a few reasons why this might be happening with mySciLEARN:
- The student username is different in mySciLEARN and RapidIdentity. The usernames must match exactly. Learn more.
- Check that the LDAP attribute has been added to the Federation Partner and that it is configured correctly. Learn more.